| Automotive
Replacement Bulbs: |
Other
Products: |
Reference: |
| 1156
1157 1142 2357 7507 7225 Bayonet Tail-Brake Turn Signal Back Up |
LED
Light Fixtures & Strobes |
Specs |
| 3157
3156 3457 4157 3057 Wedge Tail-Brake-Turn Signal & Back-Up
Bulbs |
Lights
For the Home, Yard & Garden |
Cross
Reference |
| 7443
7440 Wedge Tail-Brake-Turn Signal & Back-Up Bulbs |
Electrical
Contacts, Sockets, Connectors & Fuses |
Technical
Data |
| 194
168 W5W Wedge Side Marker License Plate & Interior Bulbs |
Light
Bright NEON Glow Wire |
Bulb
Dimensions |
| 37
74 Gauge & Instrument Panel & Neo-Wedge Bulbs |
High
Powered Leds |
General
Bulb Information |
| 3022
3122 561 578 6418 6411 Festoon Dome Bulbs |
LED
& Neon Light Tubes |
Application
Charts |
| Ba9s,
E10, Ba7s, Small Ba15s and Bay15d Bayonet Bulbs |
MR11
& MR16 Bulbs |
Bases
& Filaments |
| 906
921 Wedge Stop & Interior Bulbs |
LED
Flashlights Worklights & Bulbs |
Shipping |
| Headlights
& Foglights |
LED
Screw Mount Indicator& Accent Lights |
Mail
Orders |
| HID
Systems |
Track
Lights |
International
Shipping |
| LED
Flashers, Protectors, Load Equalizers Turn Signal Fix |
LED
Light Fixtures for the Home & RV |
FAQ'S |
| 6
Volt Antique - Vintage Bulbs & 24 volt |
Windshield
Washer LEDS |
|
| Marine
Bulbs |
Electrical
Wire |
|
| Dura
Chrome Titanium Platinum Silver Vision Bulbs |
LED
Bike, Go Ped, Motorcycle, ATV, Boat and RV Light Fixtures |
|
| Xenon
Plasma Super Hyper White Bulbs |
Miniature
Train Bulbs & Parts |
|
| G4
T10 2 Pin Bi- Pin |
Universal
Programmable Remote Controllers & Switches for Garage Openers |
|
 Semi,
Truck & Truck Trailer Leds
Semi,
Truck & Truck Trailer Leds
|
Seat
Covers |
|
| |
Custom
Car Graphics & Decals - Brake Caliper - Engine - Alloy Wheels |
|
Click
Here for Assembly & Wiring Instructions
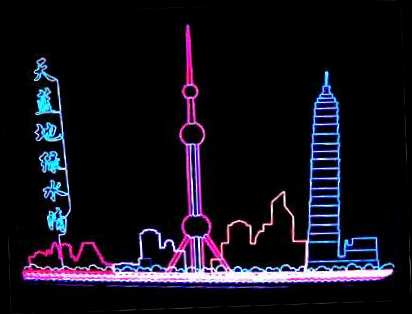
Flexible Neon Light Tubing
Great for
Vehicles, Costumes, Advertising or Just Decoration
Now you Can
Make Your Own Neon Signs & Bright Neon Decorations for a Fraction of the Cost!
IMPORTANT
NOTE: There are no returns or exchanges accepted on Neon Tubing
or Neon Tubing Products. All sales are final, and there
are no exceptions. Please do not commit to purchase if you are not
sure that you want the Neon Tubing Products.
WARNING:
Flexible Neon Tubing is made to
connect to special low voltage power sources as shown below only.
Never
connect neon flexible tubing directly to any power source, using anything other
than the appropriate adapter.
Never connect
the neon wire directly to household current.
Never connect
flexible neon tubing directly to
12 volt power sources, or automotive circuits, or any power source without the appropriate
adapters shown below.
Damage,
electrical shock or fires can occur of the flexible neon wire is plugged
directly into any non recommended power source.
The neon tubing
is safe only if connected to the approved and recommended power sources as
described below.
Warning: Never switch power on any of the neon power supplies unless the
Neon Wire is connected.
The neon power board will burn up if the neon wire is not connected
before the power is switched on.
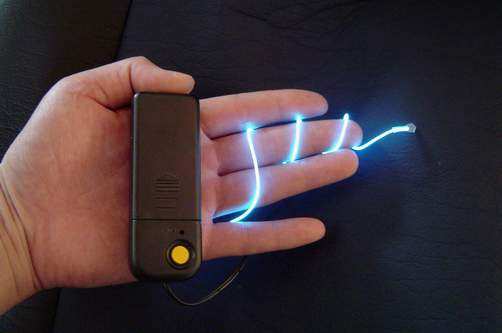
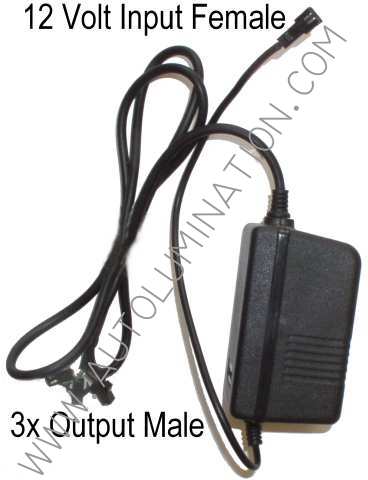
Power: Flexible neon tubing operates on
low voltage current, and must be connected thru one of our neon power adapters
in order to light and to function properly.
A number of different connections are
possible that allow the neon light tubes to light up solid, flash, and twinkle.
Flexible neon light tubes can be powered
using any 12 volt power source (such as a motorcycle, or automobile circuit,
battery packs, or even ordinary 120 volt household current using our various
power adapters available here:
Click
Here to Purchase Flexible Neon Light Components
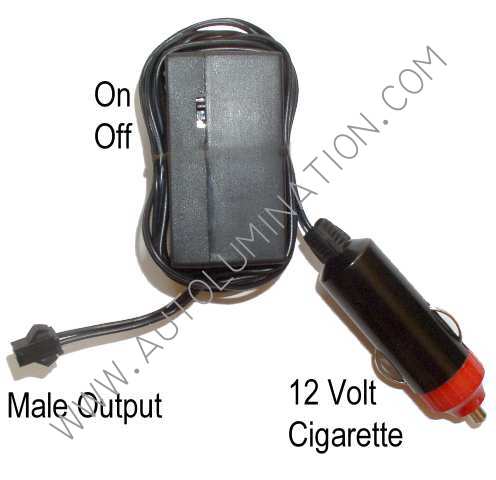
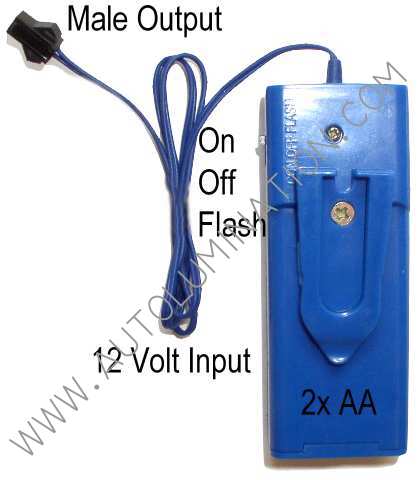
Typical Power Connections:
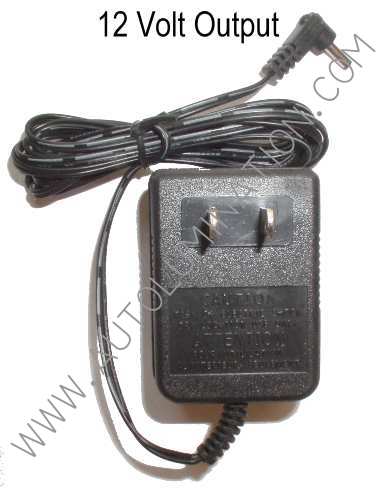
| 120
Volt Household Current: |
| 1.
120 volt power adapter (NT120V) 12 volt output
-connects to- Neon
Power Adapter (NT3V, NT3VL
or NT3VT) male plug
-connects- to female plug
pigtail -connects- to neon tubing |
|
|
 |
 |
Flexible Neon Light Tubing
Instructions
for Wire Preparation and Termination
A.
Attachment Ideas:
The
flexible neon tubing can be bent to any shape and can be attached to any
surface that dos not get too hot (less than 150 F).
Plastic
Sheet:
It is
sometimes useful to attach the tubing to a surface such as clear plastic
plexiglass oir lexan sheets. This provides a measn of anchoring the
tubing to hold a shape and still allows the light to be seen thru a glass
window from either side. Fish line, glue or tie wraps
can be used to anchor to the flat plastic sheet. Small holes can be
drilled to allow a loop to be formed with the fish line or tie wrap thru
the plastic.
Tubing on
Motorcycles ATV's and Bicycles:
It is
common to wrap the neon tubing around the frame of a Motorcycles ATV's or
bicycle. The ends can be fastened with a tie wrap.
Clothing or
Costumes:
The neon
tubing can be attached using Velcro loops, or stitches around the
tubing. Do not puncture the tubing during attachment.
|
B.
Wire Preparation & Termination:
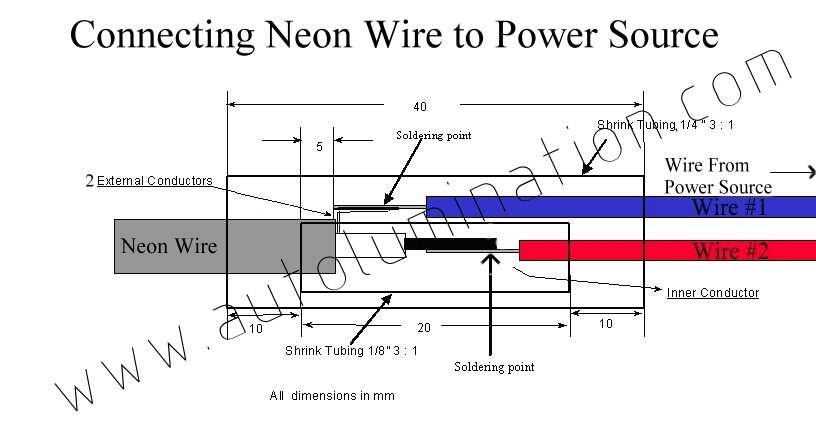
Recommended
Tools:
Scissors.
Soldering Iron, Heat
Gun, Wire cutters, Exacto Knife or Hot Knife/hot tweezers, magnifying
glass.
| Step
1: Cut
tubing to length using scissors, wire cutters or and exacto
knife.
Leave extra
length in case you mess up the termination. |
|
|
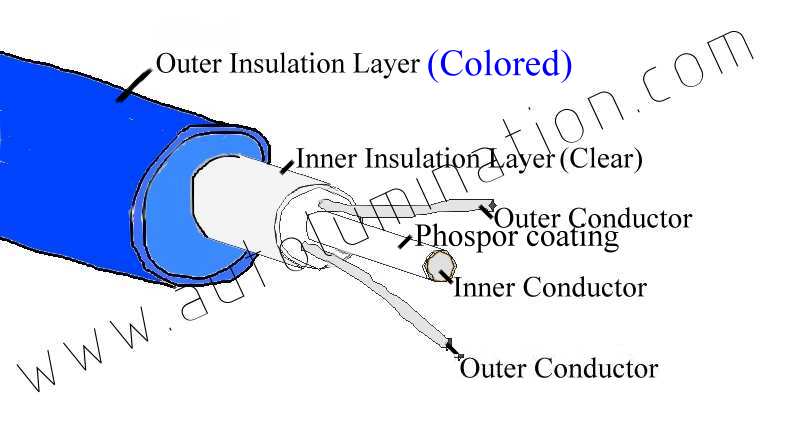
| Step
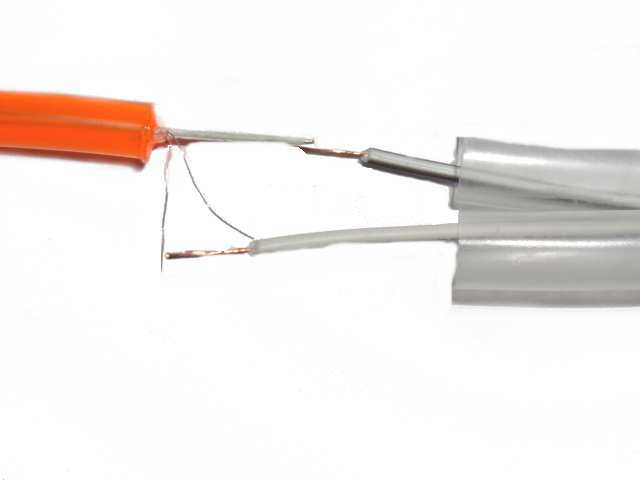
2: The neon
tubing has 2 layers of insulation. The outer layer is colored
and the inner layer is transparent.
Using a hot knife,
hot tweezers or an exacto knife, cut thru approximately 20mm of the
outer colored layer of insulation exposing the inner insulated
bundle. This must be done carefully so that the inner
insulation and delicate outer conductors inside the inner layer are
not accidentally cut off.
|
| Step
3: Using a
hot knife, hot tweezers or an exacto knife, cut thru approximately
5mm of the inner transparent layer of insulation exposing the inner
conductor and two outer conductors. This must be done
extremely carefully so that the outer conductors are not accidentally
cut off. The outer conductors are extremely tiny, like a
filament.
|
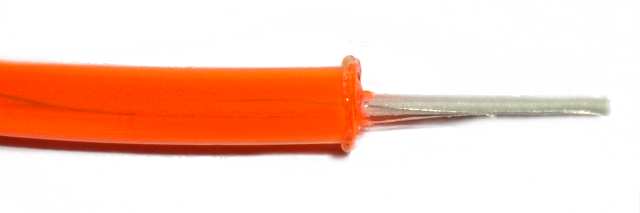
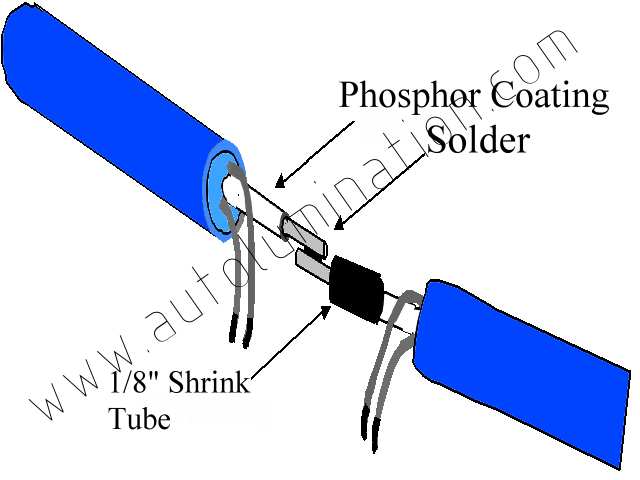
| Step
4: Using an
exacto knife, scrape the phosphor coating away off from the inner
conductor exposing about 2-5mm of the metal inside the inner
conductor. This will expose the metal of the inner conductor
so it can be soldered to later.
|
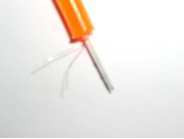
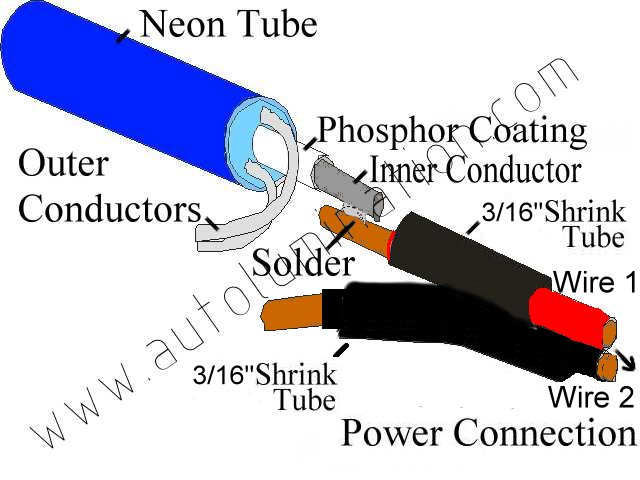
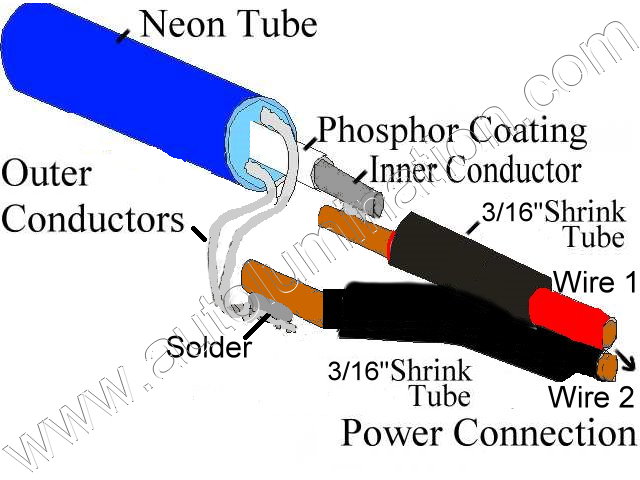
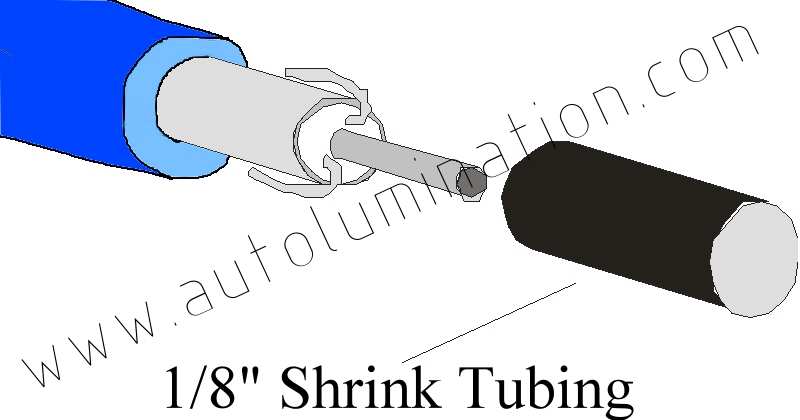
| Step
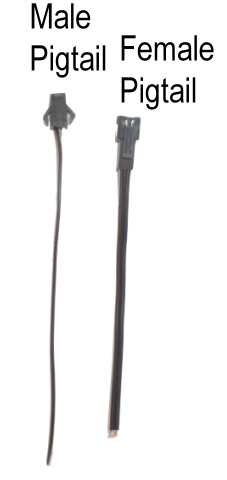
5: It
is best to attach a pre-wired female pigtail connector to the neon
tubing so that it can be easily connected and disconnected any time
from the power source. Separate the two wires on the male pigtail to
a distance of about 30mm from the end. Cut one wire on the
pigtail about 10mm shorter than the other. This will allow the
wires on the pigtail to align properly with the neon tubing.
Strip the two wires
from the pigtail connector exposing the copper wire about
5mm.
Cut a piece of
1/8" shrink tubing about 20mm-30mm long, and slide it over the
shorter wire on the pigtail connector. Tin both wires on
the pigtail connector with solder. |
| Step
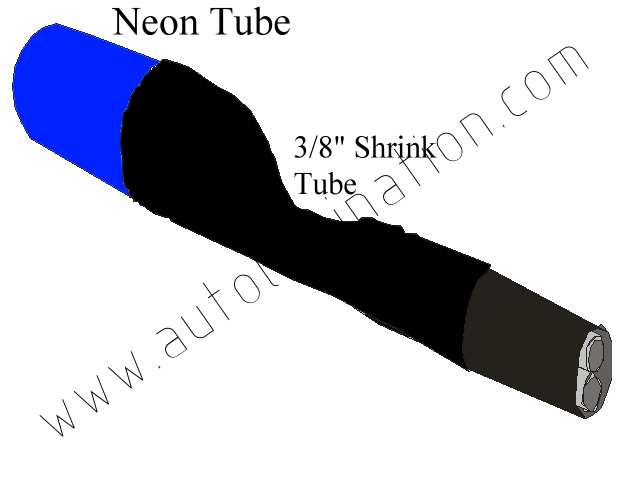
6:
Solder the inner conductor to the shorter wire on the pigtail
connector wire. (NOTE: The neon tubing has no +/-
polarity so it does not matter which wire connects to + or - )
Slide the shrink
tubing over the soldered area and shrink the tubing using a heat
gun. (Note: Heat from the soldering iron or a candle can be
used to shrink the tubing, if you do not have a heat gun if you are
careful not turn melt the solder or the tubing. |
| Step
7:
Twist the two outer conductors together and then twist the outer
conductors around the longer wire on the pigtail connector. (NOTE:
The neon wire has no +/- polarity so it does not matter which wire
connects to + or - )
Solder the outer
conductors to the longer wire on the pigtail connector
wire. (NOTE: The neon tubing has no +/- polarity so
it does not matter which wire connects to + or - ) |
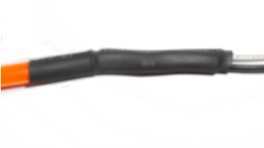
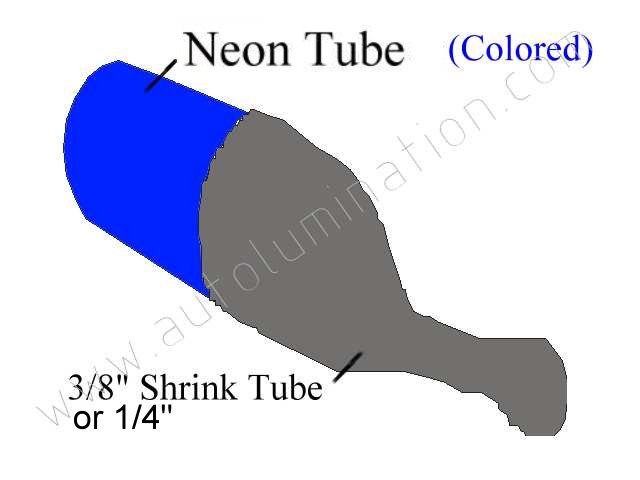
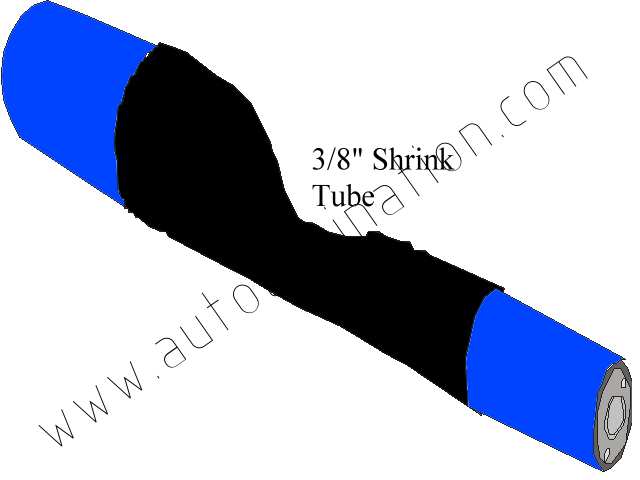
| Step
8: Cut
a piece of 3/8" diameter shrink tubing and slide it over the
entire spliced area. Shrink the tubing using a heat gun.
(Note: Heat from the soldering iron or a candle can be used to
shrink the tubing, if you do not have a heat gun if you are careful
not turn melt the solder or the tubing.
|
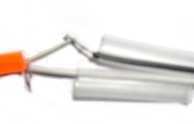
| Step
9: Test
the neon tubing to make sure it lights. If it does not light,
then one of the wires is not connected as described above, or the
other end of the tubing may have the inner and outer conductors
shorted together. You may have to re-terminate the neon tubing
or dress the non terminated end to ensure that it is not
shorted. After you ensure that the neon tubing is lighting,
you can cut the non-terminated end of the tubing to the desired
finished length. This end should be terminated to ensure that
it does not short out. The inner and outer conductors on the
non-terminated end must remain separated. This can be assured
by stripping and dressing the non-terminated end as shown in
the images below:
Alternatively, you
may dot the end with silicone after ensuring that the inner and
outer conductors are not making contact and are separated. |
|
| C.
Wire Preparation & Splicing Neon Tubing Together.
One or more sections
of neon tubing can be connected and spliced together. It can
be connected to the same or different colored neon tubing.
| Step
1:
Cut tubing to length using scissors, wire cutters or and exacto
knife.
Leave extra length
in case you mess up the termination. |
| Step
2: The neon
tubing has 2 layers of insulation. The outer layer is colored
and the inner layer is transparent.
Using a hot knife,
hot tweezers or an exacto knife, cut thru approximately 20mm of the
outer colored layer of insulation exposing the inner insulated
bundle on one end of each neon tubing to be spliced. This must
be done carefully so that the inner insulation and delicate outer
conductors inside the inner layer are not accidentally cut off.
|
| Step
3: Using a
hot knife, hot tweezers or an exacto knife, cut thru approximately
5mm of the inner transparent layer of insulation exposing the inner
conductor and two outer conductors on one end of each neon tubing to
be spliced. This must be done extremely carefully so that the
outer conductors are not accidentally cut off. The outer
conductors are extremely tiny, like a filament.
|
|
Step
4: Using
an exacto knife, scrape the phosphor coating away off from the
inner conductor exposing about 2-5mm of the metal inside the
inner conductor on one end of each neon tubing to be
spliced. This will expose the metal of the inner
conductor so it can be soldered to later. |

|
|
|
Step
5: Cut a
piece of 1/8" shrink tubing about 10mm-20mm long, and slide
it over one of the inner conductors out of the way so you can
solder. |
 |
|
|
Step
6:
Solder the inner conductors together. Slide the over
the entire spliced area. Shrink the tubing using a heat
gun. (Note: Heat from the soldering iron or a candle can
be used to shrink the tubing, if you do not have a heat gun if
you are careful not turn melt the solder or the tubing. |
|
Slide the shrink
tubing over the soldered area and shrink the tubing using a |
|
Step
7:
Twist the two outer conductors together and then solder the
outer conductors together from each section of neon tubing. |
|
|
|
Step
8:
Cut a piece of 3/8" diameter shrink tubing and slide it
over the entire spliced area. Shrink the tubing using a
heat gun. (Note: Heat from the soldering iron or a candle
can be used to shrink the tubing, if you do not have a heat gun
if you are careful not turn melt the solder or the tubing. |
 |
|
| Step
9: Test
the neon tubing to make sure it lights. If it does not light,
then one of the wires is not connected as described above, or the
other end of the tubing may have the inner and outer conductors
shorted together. You may have to re-terminate the neon tubing
or dress the non terminated end to ensure that it is not
shorted. After you ensure that the neon tubing is lighting,
you can cut the non-terminated ends of the tubing to the desired
finished length. This end should be terminated to ensure that
it does not short out. The inner and outer conductors on the
non-terminated end must remain separated. This can be assured
by stripping and dressing the non-terminated end as shown in
the images below:
Alternatively, you
may dot the end with silicone after ensuring that the inner and
outer conductors are not making contact and are separated. |
|
Payment Methods
We accept  CLICK
HERE FOR DETAILED INSTRUCTIONS ON HOW TO PAY USING YOUR CREDIT CARD:
CLICK
HERE FOR DETAILED INSTRUCTIONS ON HOW TO PAY USING YOUR CREDIT CARD:
We also accept check or money order.
You can mail your orders to:
Chris Bacon at:
P.O Box 1642
Higley, AZ 85236-1642

Standard Rates (US Only)
*Via US Postal First Class
Mail
*
Orders weighing more than 1 lb will ship via parcel post unless
special shipping options are added (below).
Shipping & Handling
|
Total Order
|
Cost |
|
$.01-$9.99 |
$2.50 |
|
$10.00-$49.99 |
$3.00
|
|
$50.00-$99.99 |
$5.00
|
|
$100-$199.99 |
$10.00
|
|
$200+ |
$15.00
|
*Note: If you do not add any
special shipping options to your order, we will automatically ship via US
postal first class mail.
You must choose a special shipping
option (see below) in order to get a tracking number.
All International orders must
choose an international shipping option.


UPIC Shipping Insurance
Just
$1.30 for up to $100 of merchandise
For
each $100 of Insurance
Note: Our
packages are not automatically insured against loss
during shipping. Insurance is the responsibility
of the purchaser!
$1.30 for each $100 unit of
insurance
Shipping Insurance
$1.30 per
$100
| Automotive
Replacement Bulbs: |
Other
Products: |
Reference: |
| 1156
1157 1142 2357 7507 7225 Bayonet Tail-Brake Turn Signal
Back Up |
LED
Light Fixtures & Strobes |
Specs |
| 3157
3156 3457 4157 3057 Wedge Tail-Brake-Turn Signal &
Back-Up Bulbs |
Lights
For the Home, Yard & Garden |
Cross
Reference |
| 7443
7440 Wedge Tail-Brake-Turn Signal & Back-Up Bulbs |
Electrical
Contacts, Sockets, Connectors & Fuses |
Technical
Data |
| 194
168 W5W Wedge Side Marker License Plate & Interior
Bulbs |
Light
Bright NEON Glow Wire |
Bulb
Dimensions |
| 37
74 Gauge & Instrument Panel & Neo-Wedge Bulbs |
High
Powered Leds |
General
Bulb Information |
| 3022
3122 561 578 6418 6411 Festoon Dome Bulbs |
LED
& Neon Light Tubes |
Application
Charts |
| Ba9s,
E10, Ba7s, Small Ba15s and Bay15d Bayonet Bulbs |
MR11
& MR16 Bulbs |
Bases
& Filaments |
| 906
921 Wedge Stop & Interior Bulbs |
LED
Flashlights Worklights & Bulbs |
Shipping |
| Headlights
& Foglights |
LED
Screw Mount Indicator& Accent Lights |
Mail
Orders |
| HID
Systems |
Track
Lights |
International
Shipping |
| LED
Flashers, Protectors, Load Equalizers Turn Signal Fix |
LED
Light Fixtures for the Home & RV |
FAQ'S |
| 6
Volt Antique - Vintage Bulbs & 24 volt |
Windshield
Washer LEDS |
|
| Marine
Bulbs |
Electrical
Wire |
|
| Dura
Chrome Titanium Platinum Silver Vision Bulbs |
LED
Bike, Go Ped, Motorcycle, ATV, Boat and RV Light Fixtures |
|
| Xenon
Plasma Super Hyper White Bulbs |
Miniature
Train Bulbs & Parts |
|
| G4
T10 2 Pin Bi- Pin |
Universal
Programmable Remote Controllers & Switches for Garage
Openers |
|
|
Semi,
Truck & Truck Trailer Leds
|
Seat
Covers |
|
| |
Custom
Car Graphics & Decals - Brake Caliper - Engine - Alloy
Wheels |
|
Stealth
Stratus Viper Ford Aerostar Aspire Bronco Bronco II Contour Crown
Victoria Escape Escort E-Series Van Excursion Expedition Explorer
Explorer Sport Explorer Sport Trac F-100 F-150 F-250 F-350 Fairlane
Fairmont Falcon Five Hundred Focus Ford GT Freestar FreeStyle Fusion
Galaxie Model A Model T Mustang Probe Ranchero Ranger Taurus Tempo
Thunderbird Torino Windstar GMC Envoy Jimmy Safari Savana Sierra
1500 Sierra 2500 Sierra 3500 Sonoma Suburban Typhoon Yukon Honda
Accord Civic CR-V CRX Del Sol Element Insight Odyssey Passport Pilot
Prelude Ridgeline S2000 Mercedes Benz 190 Series 200 Series 300
Series 400 Series 500 Series 600 Series C Class CL Class CLK Class
CLS Class E Class G Class M Class S Class SL Class SLK Class SLR
McLaren Hummer H1 H2 H3 Hyundai Accent Elantra Santa Fe Sonata
Tiburon Subaru Forester Impreza Legacy Outback SVX Suzuki Infiniti
FX G20 G35 I30 I35 J30 M Q45 QX4 QX56International Harvester Scout Isuzu
Amigo Rodeo Trooper VehiCROSS Audi A4 A6 A8 Allroad Cabriolet S4 S6
TT Austin Austin Healey Bentley Jaguar E-Type S-Type XJ6 XJ8 XJR XJS
XK8 X-Type Kia Rio Sedona Sephia Sorento Spectra Sportage
Lamborghini Lancia Land Rover Defender Discovery Freelander
LR3 Range Rover Lotus Elise Esprit Maserati Mini Classic Mini
Mini Cooper Mini Cooper S Mitsubishi 3000GT Diamante Eclipse Galant
Lancer Mirage Montero Nissan 200SX 240SX 280ZX 300ZX 350Z Altima
Armada Frontier Maxima Murano Pathfinder Quest Sentra Stanza Titan
Xterra Mazda 323 626 929 B-Series Pickups Mazda3 Mazda6 Millenia MPV
MX-3 MX-5 Miata MX-6 Protege RX-7 RX-8 Tribute Oldsmobile 442 Alero
Aurora Bravada cutlass Eighty-Eight Intrigue Ninety-Eight Silhouette
Toronado Plymouth Acclaim Barracuda Duster Fury Grand Voyager GTX
Neon Prowler Road Runner Satellite Sundance Voyager Pontiac
Bonneville Catalina Fiero Firebird G6 Grand Am Grand Prix GTO Le
Mans Montana Solstice Sunbird Sunfire Tempest Trans Am Vibe Porsche
356 911 912 914 924 928 930 944 968 Boxster Cayenne Cayman Toyota
4Runner Avalon Camry Celica Corolla FJ Cruiser Highlander Land
Cruiser Matrix MR2 Paseo Previa Prius RAV4 Sequoia Sienna Solara
Supra Tacoma Tercel Tundra Triumph Spitfire TR-6 Volkswagen Beetle
(Pre-1998) Beetle - New (1998-Present) Bus/Vanagon Cabrio EuroVan
Golf Jetta Karmann Ghia Passat Rabbit Thing Touareg Volvo 240
740 850 940 C70 S40 S60 S70 S80 V40 V50 V70 XC (Cross Country) XC90
Willys SRT 4 SRT 8 Z8 Buick QX56 International